We built 2 arm rigs, IK and FK. The IK rig is for when we need the hand to stay still or hold something, in an IK arm rig the hand moves the arm or holds the hand still while the body moves. The FK rig swings the arm from the shoulder and elbow joints. Here I describe building an IK rig.
build the arm
- Create arm joints opposite and matching to left side.
- Create control curves, one for the Pole Vector, and an arm control
- Centre the pivot of the arm control at the wrist joint, and the PV behind the elbow
- freeze the 2 controls.


The controller controls arm with an IK RP.
control the direction of the elbow
This is of course done so that the elbow will bend in the preferred direction every time.
- Set the preferred angle of the elbow
- Select RP solver in IK handle options and click shoulder then wrist joints.
- pole vector constrain the IK handle to the PV control

set up the wrist rotation
- Point constrain the IK handle to the arm control
- orient constrain the wrist joint to the arm control

Doing it this way leaves the hand free to be animated apart from the arm.
THE HAND
Set Driven Key Rig
I did this by mistake and have left it as an extra part of rigging an arm for assessment.
Placing Joints
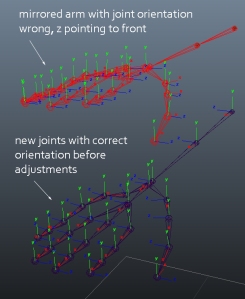
Making a 2nd hand the same as the first is difficult because it is complex and has to be exactly the same but opposite. Using mirrored joints won’t work because the joint orientation will be wrong and un-fixable. It is important that joint orientation is correct. If orientation is different from the rest of the skeleton rotations will be different and wrong.
- Mirror the 1st arm joints (I only raised it up in the picture for the picture, leave it in place)
- colour them by putting them in a layer and choosing a colour for it so it is easy to differentiate them, here it’s red.
- Make new joints similar to the other side and name them
- V snap them into the same place as the mirrored arm. (un-parent hand main joint and delete arm)
- Another way to make the hand joints is import the bind skeleton and copy the hand and hide the rest of the skeleton so you can unhide it to check placement at any time.

- Check that the joints are in the correct position by importing the bind skeleton and checking
- Duplicate the hand control curve from the other side or make it from scratch in the same manner as foot curve.
- snap it to the hand palm joint so it is out of the way of the other arm controls.
- reverse its X scale
- freeze and delete history

Orienting Joints
There are 3 different kinds of orientations needed in the hand. The normal joint orientation with X axis going towards the child joint is the first. World orientation is required for core joints, that have more than 1 joint coming from them, because it cannot point to all the children, cannot choose, would be wrong for at least 1 of them if it could and so it will have to be in line with the rest of the skeleton. The other kind of orientation in the hand is ‘custom orientation’ where we alter the orientation by hand, this is described a bit later.
- Orient all the joints except the core joints with the options reset of orient joint. To do this un-parent these joint chains in the fingers then orient.

- In orient joint options tick orient joint to world and un-tick orient children of selected joints. Make sure the base joints are un-parented and parenting nothing and orient.

- the thumb bridge joint and pinky finger bridge joint have custom orientations applied to them.
This where I realised (too late) that we don’t need to do the hand for the assessment and it had taken me a whole day…… I may as well finish it because I have to do it anyway on the right hand..
custom orienting
Custom orientation is needed at the bridge joints of the thumb and pinky finger so that they can drop down and rotate under the hand in 1 smooth rotation to enable the bringing together of the tips of these digits, this is a specialised movement of the hand. Without the custom orientation it takes many different individual rotations to get there and is bad for animating. Un-parenting joints is often required before orienting joints will work properly.
- to custom orient select the joint
- component mode and select the question mark to the right

- select the rotation tool
- rotation tool options- reset tool, tick discrete rotate and choose the step size, 10 degrees is a good one
- make sure you select the jont axis to rotate not the joint
- rotate the joint axes as you want and write it down so you can put in the same amounts on the other hand.

setting up set driven keys
This is to have any movements which you may want easily available to animate with, in this case for the hand eg relax, spread and individual finger curls etc. You set keys at 0 for the starting position and say 10 and at 10 you rotate all the joints for the hand to be in the position you want and key it so that when you middle mouse button drag for the attribute the hand moves into position without having to move each joint and rotation individually.
- select hand control
- highlight all the translate, rotate and scale attributes and ‘lock selected‘ (because you don’t want to add these to the control and it keeps them out of the set driven key window)
- add attributes (as for the foot rig) for all the hand movements you want for the control eg fist, relaxed, scratch, spread, index curl, middle curl, ring curl, pinky curl, thumb curl, thumb roll.
- in the animation menu set select animate, set driven key, set
- select the hand control
- click load driver
- select all the joints of the hand needed to animate and select load driven
- select all the joints in the driven window then rotate X, Y and Z on the right
- select a movement in the driver right window eg index curl
- make sure all are set at 0
- click key
- again select the control curve
- put in say 10 for index curl
- select all the chosen finger joints and in the channel box put a value say -80 in rotate Z
- make sure the correct movement, finger joints and rotation axis are all chosen in the SDK window
- hit key
- repeat for all movements

